Deploy your Hugo site on AWS with Terraform v2
In my previous article, we discussed how to set up a static website with Hugo on AWS using Terraform, particularly the one hosting this site.
It’s been over a year (maybe two) since this site has been deployed this way, and I’ve had the opportunity to make several improvements and changes.
In this article, we will explore the new additions made to this site, including:
- The use of OAC. instead of OAI.
- Upgrading the Terraform AWS provider to version 5.
- Adding GitHub Action (for automatic site deployment) and dynamically injecting AWS credentials.
- Enhancing the Terraform stack with autoconfiguration of ACM (AWS Certificate Manager) with AWS Route53.
TL;TR: For those who want to deploy their AWS infrastructure with the new version, here is the GitHub repository.
Prerequisites
To understand this post, you should:
- Have a basic understanding of AWS.
- Be familiar with Terraform, especially how to deploy on AWS using Terraform.
- Have reviewed the previous article to grasp the context.
To reproduce the example in this blog, you need to:
- Have an AWS account and credentials..
- Have a domain name.
- Deploy the infrastructure on AWS using Terraform.
Infrastructure overview
In the previous article, we deployed the following infrastructure:
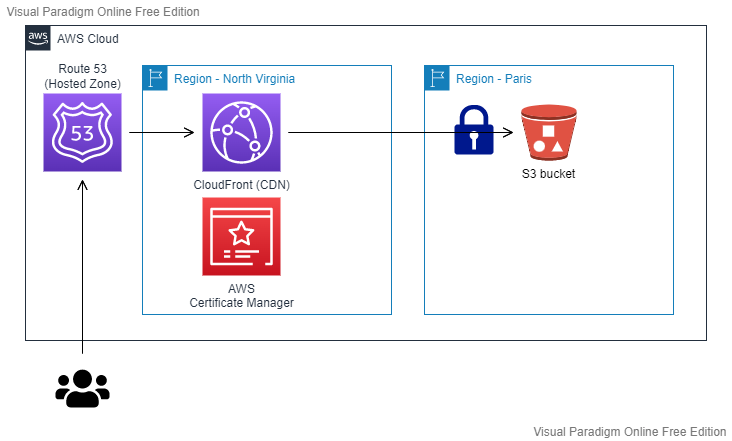
We have:
- Amazon Route 53: Hosting our Hosted Zone and domain (
mehdilaruelle.com) - Amazon CloudFront: Serving as a CDN (Content Delivery Network) and the entry point for our end users.
- AWS Certificate Manager: Hosting our certificate and used by Amazon CloudFront for
HTTPS - Un bucket S3: Hosting our static website deployed by Hugo and only accessible via Amazon CloudFront. Our bucket is therefore
private
The entire infrastructure is deployed using Terraform.
Replacing OAI with OAC
In the architecture we’ve seen, the S3 bucket is private and can only be accessed through Amazon CloudFront. Previously, the method used was Origin Access Identity (OAI) which is now deprecated. As a replacement, AWS has introduced Origin Access Control (OAC).
Unlike OAI, which was seen as a principal IAM CloudFront, OAC is treated as an AWS CloudFront resource. The advantages of OAC over OAI include support for:
- All S3 buckets in all regions.
- Server-side encryption with AWS KMS (SSE-KMS).
- Dynamic requests (PUT and DELETE) to Amazon S3.
The migration is relatively simple and involves the following steps:
- Create an OAC
- Set the bucket policy
- Update Amazon CloudFront by replacing OAI with OAC
You can find the GitHub commit related to this migration or refer to the official AWS documentation on the subject for more details.
Upgrading to Terraform AWS Provider Version 5
It’s not every day that the Terraform AWS provider receives a major update, so it’s only natural to consider the upgrade. For those who are curious and want to learn more about the new features of the provider, I invite you to check out HashiCorp’s Upgrade Guide.
There is no impact on the Terraform code, but I prefer to explicitly mention it in the Terraform code for clarity:
terraform {
  required_providers {
    aws = {
      source  = "hashicorp/aws"
      version = "~>5.0"
    }
  }
}
For those who are not familiar with it, you can use tfupdate in conjunction with pre-commit-terraform to help keep your Terraform dependencies up to date
Github action & AWS dynamic credentials
Until recently, I used to deploy my blog posts and update themes locally from my terminal because my blog post deployment frequency was relatively low. However, I encountered two main issues:
- With each deployment, I could face problems related to cached remnants or other anomalies associated with my local environment.
- I was using static AWS credentials that were used at best once every three months. This was less than ideal for static credentials.
To address these issues, I implemented the following solutions:
- I set up GitHub Actions (free for up to 2000 minutes per month) to automate the deployment of my site with each
git push. - I implemented temporary AWS credentials for each deployment in GitHub Actions. This approach improves security and reduces the reliance on static credentials.
Setting up GitHub Action
My goal is: “For every push on my master branch, I want my Hugo site to be deployed to S3”.
The good news is that on GitHub Action, this can be done easily and for free, as there are pre-built Actions available.
Initially, I used the Action Hugo created by peaceiris for using Hugo in GitHub Actions.
Here is the content of my GitHub Actions workflow file .github/workflows/main.yml:
name: Hugo deploy website on S3

on:
  push:
    branches: [ main ] # Only when a push is done on main branch

permissions:
      contents: read    # This is required for actions/checkout

jobs:
  Build_and_Deploy:
    runs-on: ubuntu-latest
    steps:
    # Checks-out your repository under $GITHUB_WORKSPACE, so your job can access it
    - name: Git clone the repository
      uses: actions/checkout@v4
      with:
        submodules: 'true' # Some Hugo theme are imported as a submodule, so you need it
    # Sets up Hugo with latest version
    - name: Setup Hugo
      uses: peaceiris/actions-hugo@v2
      with:
          hugo-version: 'latest'
          extended: true
    - name: Build
      run: hugo --minify
    - name: Deploy to S3
      run: hugo deploy --force
If we summarize the steps of our job, we have:
- Checkout: This step allows us to clone our repository with the necessary submodules for the Hugo themes.
- Setup Hugo: We install Hugo in the extended edition because some of my themes use features from this edition.
- Build: We build our static website, applying minification.
- Deploy: Finally, we deploy our Hugo website to S3.
To ensure that Hugo knows how to deploy, at step 4, you’ll need to add the appropriate configuration to your config.toml file.
In my case, the configuration snippet looks like this:
  [deployment]

  [[deployment.targets]]
    name = "aws"
    URL = "s3://hugo-website-mlaruelle?region=eu-west-3"
Note
The URL should include the region. In my case, the region is eu-west-3 (Paris).
At this point, almost everything is functional. However, we are missing the necessary permissions to deploy to the S3 bucket.
Setting up temporary AWS credentials
So far, I had been using an IAM user with static credentials. However, with deployments now being handled by GitHub Actions, I decided it was time to switch to temporary credentials to have “single-use credentials for each deployment”.
To achieve this, I used AWS Assume Role With Web Identity with GitHub Action.
I invite you to learn more about the entire process and configuration through the official GitHub Action documentation. In our case, we can summarize the migration to this method in two steps:
- Setting up Web Identity.
- Implementing the GitHub Action
configure-aws-credentials-for-github-actions
Step 1: Setting up Web Identity
The first step involves setting up an Identity Provider (from OIDC type) at the IAM service level and establishing a trust link from IAM Identity Provider to the GitHub Action to let GitHub Action assume our role.
In a simplified version, it looks like this:
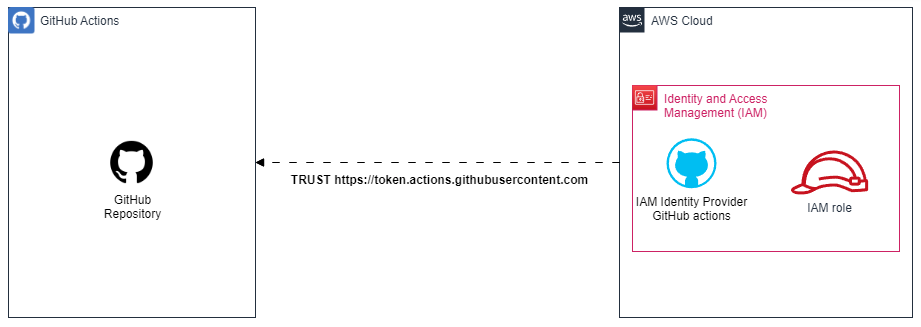
To accomplish this, I’ve set up Terraform to establish the Web Identity, which I invite the curious to explore.
In the repository Terraform, to enable the deployment
of the Web Identity for your GitHub repository, you need to provide values for the github_org (GitHub organization name)
and github_repositories (a list of GitHub repositories authorized to assume the Web Identity role). In my case, it looks like this:
github_org          = "mehdilaruelle" # GitHub Organization name
github_repositories = ["blog_hugo"] # The list of GitHub repositories to allow to assume the Web Identity role
Then, run terraform apply and retrieve the output of aws_role_arn using terraform output aws_role_arn.
Keep this output; we will need it for the GitHub Action configuration.
Step 2: Setting up the GitHub Action configure-aws-credentials-for-github-actions
Finally, in step 2, we want GitHub Action to be able to assume our role.
In a simplified version, it looks like this:
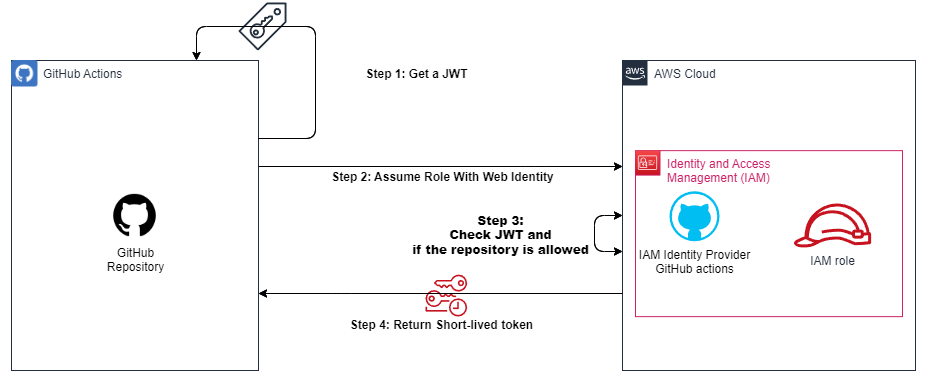
We will complete our GitHub Action Workflow with the action configure-aws-credentials-for-github-actions. To do this, you need to:
- Grant permission to your workflow to use a JSON Web Token GitHub.
- Add the step with our GitHub Action configure-aws-credentials-for-github-actions provisioning our
aws_role_arnas a parameter to the step.
This results in the final and functional configuration as follows:
name: Hugo deploy website on S3

on:
  push:
    branches: [ main ]

permissions:
      id-token: write   # This is required for requesting the JWT
      contents: read    # This is required for actions/checkout

jobs:
  Build_and_Deploy:
    runs-on: ubuntu-latest
    steps:
    # Checks-out your repository under $GITHUB_WORKSPACE, so your job can access it
    - name: Git clone the repository
      uses: actions/checkout@v4
      with:
        submodules: 'true'
    - name: configure aws credentials
      uses: aws-actions/configure-aws-credentials@v4
      with:
        role-to-assume: arn:aws:iam::012345678912:role/GitHubOIDCRole # To replace with aws_role_arn
        role-session-name: githubActionHugoDeploy
        aws-region: eu-west-3
    # Sets up Hugo with latest version
    - name: Setup Hugo
      uses: peaceiris/actions-hugo@v2
      with:
          hugo-version: 'latest'
          extended: true
    - name: Build
      run: hugo --minify
    - name: Deploy to S3
      run: hugo deploy --force
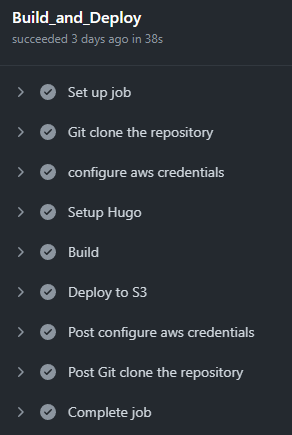
With the following result, after a git push via GitHub Action:
Auto setup of ACM (AWS Certificate Manager)
In the construction of the website, we assumed in the previous article that the domain name (or subdomain) is hosted on Amazon Route 53, and the Hosted Zone must be created manually.
Until recently, creating the certificate in AWS Certificate Manager (ACM) was also a manual process. This changed following this commit, which can be summarized through the following snippet:
resource "aws_acm_certificate" "hugo" {
  provider          = aws.aws_cloudfront # CloudFront uses certificates from US-EAST-1 region only
  domain_name       = local.dns_name
  validation_method = "DNS"
}

resource "aws_route53_record" "hugo" {
  for_each = {
    for dvo in aws_acm_certificate.hugo.domain_validation_options : dvo.domain_name => {
      name   = dvo.resource_record_name
      record = dvo.resource_record_value
      type   = dvo.resource_record_type
    }
  }

  allow_overwrite = true
  name            = each.value.name
  records         = [each.value.record]
  ttl             = 60
  type            = each.value.type
  zone_id         = data.aws_route53_zone.hugo.zone_id
}

resource "aws_acm_certificate_validation" "hugo" {
  provider                = aws.aws_cloudfront # CloudFront uses certificates from US-EAST-1 region only
  certificate_arn         = aws_acm_certificate.hugo.arn
  validation_record_fqdns = [for record in aws_route53_record.hugo : record.fqdn]
}
Info
You can find this snippet directly in the official HashiCorp documentation.
New Domain Name
Finally, the last update regarding the website is the change of the domain name from blog.mehdilaruelle.ninja to mehdilaruelle.com.
This change was primarily driven by the rising cost of global domain names, especially the .ninja domain.
This change posed several challenges, including:
- Updating Hugo’s configuration in
config.toml(relatively easy) - Updating the SSL certificate (easily automated with Terraform)
- Redirecting
blog.mehdilaruelle.ninjatomehdilaruelle.com, considering that the domain hosting is on the OVH side
The last challenge led me to implement a redirection mechanism with path preservation (which is not freely available on the OVH side) using serverless technology via Amazon API Gateway. However, this topic will be covered in another article.
Conclusion
The various improvements to the website have provided me with a much smoother and transparent release experience, especially through the integration of GitHub Action and dynamic AWS credentials. Additionally, for Terraform updates, you can use tfupdate in combination with pre-commit-terraform to keep your dependencies up to date.
Info
In the Terraform repository for deploying this site, le pre-commit-terraform is used.
Lastly, in an upcoming blog post, we will delve into the details of the path-preserving redirection mechanism using Amazon API Gateway. If you have other improvement ideas, feel free to reach out to me.
HashiCorp Hugo Terraform AWS Serverless Static Github Actions Website Blog S3 Cloudfront HTTPS SSL TLS Certificate OIDC
1825 Words
2023-10-31 16:30