8 minutes | Also available in Français
Deploy your Hugo site on AWS with Terraform
Many of you have asked yourself the following question:
How to set up a simple site at low cost with little (or no) maintenance?
I went through this same question myself, and wanted to answer it through this post.
In this post, we will see how to set up a static website with Hugo on AWS using Terraform.
Spoiler alert: You will go behind the scenes of how this site is made.
TL;TR: For those who wish to deploy their infrastructures on AWS, here is the repository GitHub
Warning
The website has been updated and upgraded since then. For those of you who are curious, I invite you to take a look at the next chapter of this article
Prerequisites
To understand this post, you must:
- Have some knowledge of AWS
- Know Terraform and in particular deploy on AWS with Terraform
To reproduce the example of this blog, you must:
- Have an AWS account and credentials
- Have a domain name
- Deploy the infrastructure on AWS with Terraform
The beginning: What do we need?
To resume our question:
How to set up a simple site at low cost with little (or no) maintenance?
For this we need:
- Simple site: is often a static website.
- No maintenance: brings us to the concept of Serverless.
- HTTPS: For this, we first need a domain name and a certificate.
- Low cost: The goal is to pay 0 each month.
1st step: the choice
In our adventure, we need a static website generator and a static website host.
The static website generator
In this post we will see Hugo mainly to discover the product but there are other products such as:
The purpose of this post is not to compare generators.
The static website hosting
There are several solutions to host your static website for free, for example:
- GitHub Page : I recommend
- OVHCloud : Free after purchasing a domain name
- Netlify : The blog post explains it all.
Here, the choice of AWS was made because it is one of (if not the) most used cloud providers. It is of course possible to do this on other Cloud Providers such as GCP, Azure, etc
2nd step: A static website on Amazon S3
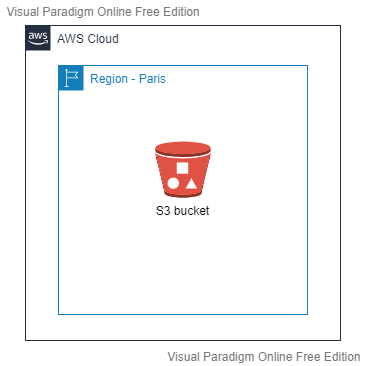
To host a static website on AWS, we can use Amazon S3 with the hosting a static website feature.
This will yield the following schema (based on AWS’s Paris region):
Advantage:
- The architecture is simple
Disadvantage:
- No HTTPS. The documentation is clear:
Amazon S3 website endpoints do not support HTTPS. If you want to use HTTPS, you can use Amazon CloudFront to serve a static website hosted on Amazon S3.
- No custom domain name for your website unless the bucket name is the same as your domain name. Otherwise you will additionally need to use Amazon Route 53
Pricing:
- Amazon S3: $0.024/GB per month. It all depends on the size of your site (especially media content). But free if you use the AWS Free Tier
Conclusion : If having an HTTP website is enough for you, you can stop there and start using Hugo (go to step 4). Otherwise, see you in the third step.
Step 3: Setting up HTTPS
Putting an HTTPS on our site is more complex than it seems. Indeed, we must:
- Have a domain name
- Have a certificate for the usage of HTTPS
- Amazon CloudFront to activate the HTTPS
Setting up the domain name
2 choices are available to you:
- Use Amazon Route 53: which simplifies our configuration both for certificate generation (for HTTPS) and Amazon Cloudfront configuration. 0.50$ per month for the creation of a public hosted zones on Amazon Route 53.
- Do not use Amazon Route 53: It is possible to not use Amazon Route 53 for configuring Amazon CloudFront and to create the certificate. The action will require more effort and manual action.
Info
For my part, I use OVHcloud domain for hosting my root domain name (mehdilaruelle.ninja) and a public hosted zones on Amazon Route 53 for my subdomain (blog.mehdilaruelle.ninja). In my case, I chose Route 53 for my subdomain for simplicity.
In our case, Amazon Route 53 is used. Our Terraform does not create the hosted zone (because it depends on where your domain name is located), so you will have to create and configure it.
Setting up the certificate
For the certificate, we use AWS Certificate Manager (ACM). The advantage of ACM is to be able to renew our certificates automatically and will be used for the HTTPS on Amazon CloudFront.
Pricing :
- ACM: As we use a public certificate, the use of ACM is free.
In our case, our Terraform does not create the certificate because it takes a little time to issue it, which can fail our Terraform execution, so we will have to create the certificate manually.
Warning
The certificate must be created in North Virginia (us-east-1) because Amazon CloudFront only uses certificates in this region. Consider changing regions to N. Virginia (us-east-1)
Setting up our CloudFront distribution
Once the domain name and certificate are ready, we can start deploying our infrastructure via Terraform.
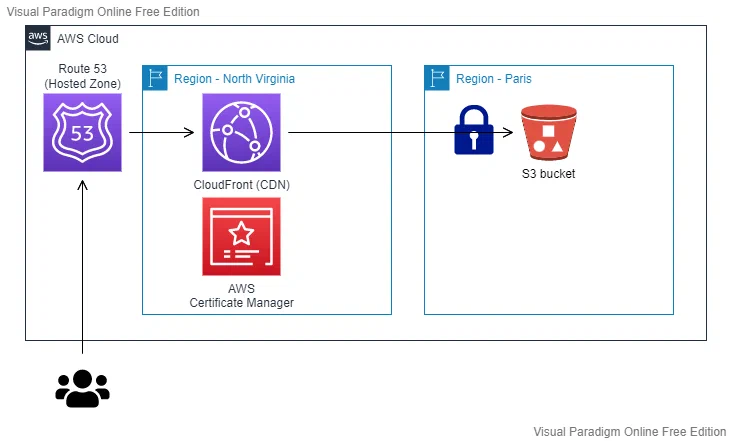
The infrastructure should look like this:
Warning
CloudFront can only be created in North Virginia (us-east-1).
On the GitHub repository, add a terraform.tfvars file with
the following variables and values:
bucket_name: is the s3 bucket that will be createddns_name: will be the domain name used via Route 53
Note
To do: Change the contents of the backend.tf file with the configuration of your own Terraform backend
Once the GIT repository is ready, run your commands (check your AWS credentials beforehand):
$ terraform init
$ terraform plan
$ terraform apply
The Terraform deploys:
- A S3 bucket: this S3 bucket will contain our static website. The content thereof is private and accessible only by CloudFront via an Origin Access Identity (OAI). In other words, our users will have to go through Amazon CloudFront and not directly on Amazon S3 to access our website.
- A CloudFront distribution: will allow us to use HTTPS on our website, to use a custom domain name, to set up a Content Delivery Network (CDN) and enhance security through the AWS Shield service.
Pricing :
- Amazon CloudFront: this varies depending on the number of visitors to your site. Around $0.08/GB for data transfer out per month from CloudFront.
Redirects case with CloudFront
The challenge encountered in this deployment is that some URLs in Hugo end this way: my.website.com/posts/.
To make it work, you need to implement a redirect that adds index.html at the end of the URL.
For example, if a user enters the following URL: my.website.com/posts/ it turns into my.website.com/posts/index.html.
However, CloudFront does not follow such redirects whether implemented by S3 or otherwise. To solve this, we add a CloudFront function which will transform the URL at the CloudFront level as we want.
4th step: Deployment of our site via Hugo
At this stage, our infrastructure is ready to host our Hugo site. I recommend you to use the Hugo Quick Start to get started with Hugo.
Info
On my side, I use the theme hello-friend-ng and hugo-notice.
Once your first post has been written and your site has been built using Hugo, you can deploy your site using Hugo.
Add in your config.toml the following section:
  [deployment]

  [[deployment.targets]]
    name = "aws"
    URL = "s3://hugo-website-mlaruelle?region=eu-west-3"
Note
To do: Change the URL to your chosen S3 bucket name in your Terraform (used through the bucket_name variable)
Once added, run the following command:
hugo deploy
And now, your website is deployed.
If you want to learn more about Hugo, you can find several tutorials about it.
Feedback on my website experience
The method presented to you is used for this website. Finally, what is the verdict after several years of use?
Cost
The choice made is not the most optimized in terms of cost because I emphasized flexibility, simplicity and security.
The annual total is between $1 and $2. Add to that $6 if you use a public hosted zones on Amazon Route 53. The costs do not include the annual price of a domain name, which varies.
Info
If you use the AWS Free Tier, it costs you $0.
Pricing summary:
- Amazon S3: $0.024/GB per month. It all depends on the size of your site (especially media content).
- Amazon Route 53: 0.50$ per month for creating a public hosted zones on Amazon Route 53
- ACM: As we use a public certificate, using ACM is free.
- Amazon CloudFront: This varies depending on the number of visitors to your site. Around $0.08/GB for data transfer out per month from CloudFront.
Maintenance
No maintenance apart from occasional updates to the themes.
Conclusion
Hugo offers great flexibility for website creation at low cost (or free of charge) while staying simple. Go for a free hosting solution and you will not be disappointed.
Warning
The website has been updated and upgraded since then. For those of you who are curious, I invite you to take a look at the next chapter of this article