# Migrate your application secrets in Vault (step 2)
> Replace a static database password with credentials HashiCorp Vault generates on demand and expires on its own. Step 2 of the Vault migration series.
2019-03-28 · Vault, HashiCorp, Secrets management, Terraform
We saw in a first post [how to migrate a web application to Vault with static secrets](https://mehdilaruelle.com/posts/2019/03/migrate-your-application-secrets-in-vault-step-1/), and this without changing the code or the application operation. However, the issue of the rotation of secrets still remains and to answer this we will see together the trump card of the Vault, namely the management of dynamic secrets.
This post is part of a series:
- [Post 1: Migrate static secrets](https://mehdilaruelle.com/posts/2019/03/migrate-your-application-secrets-in-vault-step-1/)
- [Post 2: Migrate dynamic secrets (Secret as a Service)](https://mehdilaruelle.com/posts/2019/03/migrate-your-application-secrets-in-vault-step-2/)
- [Post 3: Encryption as a service](https://mehdilaruelle.com/posts/2019/03/migrate-your-application-secrets-in-vault-step-3/)
## Migration of application code to Vault with dynamic secrets (Secret as a Service)
You should know, first of all, that the use of dynamic secrets **is not feasible in 100% of cases** and depends on two criteria:
1. Can the secret be migrated into an existing [Secret Engine Vault](https://www.vaultproject.io/docs/secrets/)? It is therefore advisable to check the list of possibilities offered by Vault.
2. Can the application use a secret with a limited lifetime without redeploying the application?
In our case, the secret is a **database secret** and Vault offers the possibility to make [Secrets as a Service for database](https://www.vaultproject.io/docs/secrets/databases/index.html). On the other hand, we are going to modify the application in order to be able to use this Secret Engine.
We are therefore going to modify the **application workflow** so that our application works like this:
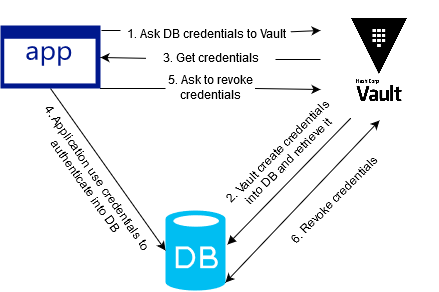 As you may have noticed, the scheme and logic are those previously explored during our introduction to Vault.
You will find the [sources here](https://github.com/d2si/vault-demo/tree/master/step2) allowing this solution to be implemented (based on the previously mounted environment).
### What are the changes made?
To start with the simplest, the script **[vault.sh](https://github.com/mehdilaruelle/vault-demo/blob/master/step1/vault.sh)** and the entrypoint of the application container are deleted. Since we are switching from “static secret” to “dynamic secret” mode and dynamic secrets have a limited duration in time, **the entrypoint no longer makes sense** because it only runs at startup.
The changes are therefore made at two levels: **Terraform and the application.**
Let's start with Terraform (the Ops part). At the level of our [terraform/main.tf](https://github.com/mehdilaruelle/vault-demo/blob/master/step2/terraform/main.tf) some changes are required:
1. Addition of a new Secret Engine type: **Database**
2. Creating a **MySQL** connection with the Secret Engine
3. **Creating a role** which defines a database user equivalent to the one used in the previous steps.
On the other hand, at the application level, we added the equivalent of the script **vault.sh** in PHP code:
1. Recovery of **Role_ID** and **Secret_ID** via environment variables
2. Vault authentication **via Approle** and retrieval of the Vault token
3. Username and password retrieval via the Vault token
In our code, we are not using a PHP SDK because our goal here is to compare the implementation of the **vault.sh** script used with static secrets (previous step) to our code. Knowing that the **vault.sh** script uses curl, we therefore use curl in our PHP code.
Of course, **the use of the PHP Vault SDK is strongly recommended** in order to simplify development.
### Testing our example
So let's test our new method, starting with the infrastructure:
1. Initialization of the terraform directory in order to fetch the right providers:
`$ docker run --rm -v $(pwd)/terraform:/app/ -w /app/ hashicorp/terraform:light init`
2. Deployment of our infrastructure:
`$ docker-compose up`
With the infrastructure operational, we can access our Vault via this address: [http://127.0.0.1:8200](http://127.0.0.1:8200)
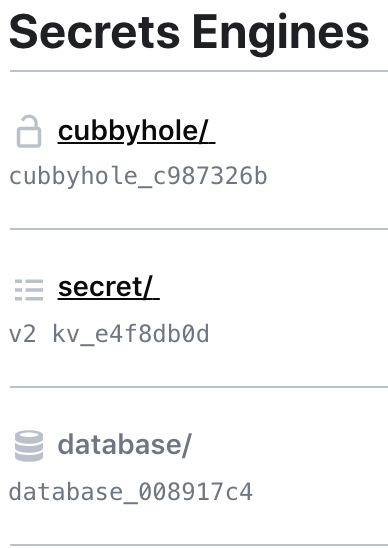
And we can see that our Secret Engine Database is present:
As you may have noticed, the scheme and logic are those previously explored during our introduction to Vault.
You will find the [sources here](https://github.com/d2si/vault-demo/tree/master/step2) allowing this solution to be implemented (based on the previously mounted environment).
### What are the changes made?
To start with the simplest, the script **[vault.sh](https://github.com/mehdilaruelle/vault-demo/blob/master/step1/vault.sh)** and the entrypoint of the application container are deleted. Since we are switching from “static secret” to “dynamic secret” mode and dynamic secrets have a limited duration in time, **the entrypoint no longer makes sense** because it only runs at startup.
The changes are therefore made at two levels: **Terraform and the application.**
Let's start with Terraform (the Ops part). At the level of our [terraform/main.tf](https://github.com/mehdilaruelle/vault-demo/blob/master/step2/terraform/main.tf) some changes are required:
1. Addition of a new Secret Engine type: **Database**
2. Creating a **MySQL** connection with the Secret Engine
3. **Creating a role** which defines a database user equivalent to the one used in the previous steps.
On the other hand, at the application level, we added the equivalent of the script **vault.sh** in PHP code:
1. Recovery of **Role_ID** and **Secret_ID** via environment variables
2. Vault authentication **via Approle** and retrieval of the Vault token
3. Username and password retrieval via the Vault token
In our code, we are not using a PHP SDK because our goal here is to compare the implementation of the **vault.sh** script used with static secrets (previous step) to our code. Knowing that the **vault.sh** script uses curl, we therefore use curl in our PHP code.
Of course, **the use of the PHP Vault SDK is strongly recommended** in order to simplify development.
### Testing our example
So let's test our new method, starting with the infrastructure:
1. Initialization of the terraform directory in order to fetch the right providers:
`$ docker run --rm -v $(pwd)/terraform:/app/ -w /app/ hashicorp/terraform:light init`
2. Deployment of our infrastructure:
`$ docker-compose up`
With the infrastructure operational, we can access our Vault via this address: [http://127.0.0.1:8200](http://127.0.0.1:8200)
And we can see that our Secret Engine Database is present:
 Now let's move on to the application. In the same logic as in the previous example, we will rely on **the same commands and methods** as those used in the previous example:
```bash
$ role_id=$(docker run --rm -v $(pwd)/terraform:/app/ -w /app/ hashicorp/terraform:light output approle_role_id)
$ secret_id=$(docker run --rm -v $(pwd)/terraform:/app/ -w /app/ hashicorp/terraform:light output approle_secret_id)
$ docker-compose -f app.yml run -e VLT_ROLE_ID=$role_id -e VLT_SECRET_ID=$secret_id --service-ports web
```
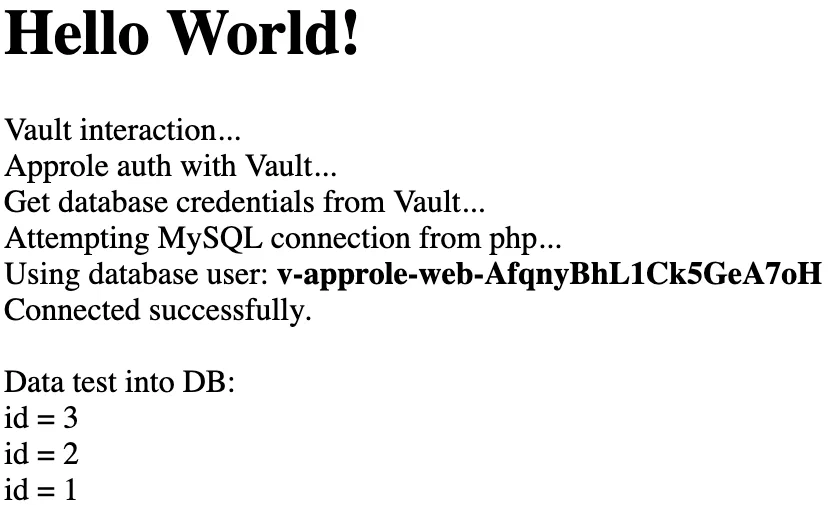
Our app is again available at [http://127.0.0.1:8080](http://127.0.0.1:8080) and the result will be the same as the previous step, except that this one **displays the database user** used when logging in:
Now let's move on to the application. In the same logic as in the previous example, we will rely on **the same commands and methods** as those used in the previous example:
```bash
$ role_id=$(docker run --rm -v $(pwd)/terraform:/app/ -w /app/ hashicorp/terraform:light output approle_role_id)
$ secret_id=$(docker run --rm -v $(pwd)/terraform:/app/ -w /app/ hashicorp/terraform:light output approle_secret_id)
$ docker-compose -f app.yml run -e VLT_ROLE_ID=$role_id -e VLT_SECRET_ID=$secret_id --service-ports web
```
Our app is again available at [http://127.0.0.1:8080](http://127.0.0.1:8080) and the result will be the same as the previous step, except that this one **displays the database user** used when logging in:
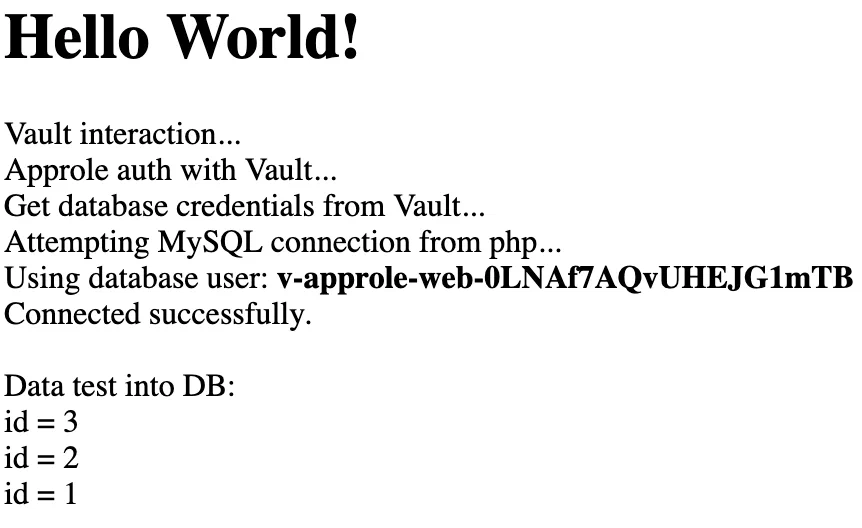
 We see that the database user **changes with each page refresh**:
 Our dynamic secret integration is working well. However, we had to **modify the application workflow** by adding code so that the application could retrieve its secrets dynamically.
Finally, for cleaning purposes, remember to run the following commands:
```bash
$ docker-compose down
$ docker-compose -f app.yml down
$ rm terraform/terraform.tfstate
```
## Migration key takeaways
- The integration of dynamic secrets requires a **modification of the application workflow and therefore of the code itself**. Indeed, the application must be "aware" that the secret has a definite lifespan, and that this one can be brought to change. This issue is not related to Vault, but to the **secret lifetime**.
- Our application no longer uses **static secrets and the entrypoint from the previous integration is no longer needed** in our example. We removed it, but if our app used any other static secrets we should have kept it.
- The scope of action of the Ops is widening and is no longer limited to the Vault but **to the entire infrastructure**. It is no longer a question of storing a simple secret in the Vault but of **setting up a connection between the Vault and the databases**. So be careful with **securing network flows** (ACL, Firewall, etc.) between Vault and databases!
- Thanks to the dynamic secret logic, each secret has a more or less short **limited lifetime**. The notion of password rotation no longer exists. The secret is issued to the application **the time it takes to interact with the service** in question (eg database): this is the philosophy of Secret as a Service.
## Warning
**The application does not necessarily revoke the secret** (the case of our demonstration). Vault will therefore have to do this after a certain period of time. **The complexity is therefore to define the lifetime of the secret**. It should be neither too short nor too long. It is therefore necessary to identify upstream the right compromise to adopt.
**It should also be kept in mind that a large number of secret creations can overload a service**. Take the case of a database: if for each connection to our website we create a user, we can quickly end up with millions of different database users every minute, in the case of a site with heavy traffic.
**The solution is therefore to set a TTL and a max TTL according to the real needs of the application**. TTL is the standard lifetime of the secret and the max TTL is the length of time the secret should not exceed no matter what. For example, we set a TTL of 1h and a max TTL of 24h. If the application considers that access to the service will be unusually long, it can request a **renew** of its secret (extend the duration of its secret) without exceeding the maximum TTL (eg: Renew its secret of one hour). The complexity is finding a good compromise (eg: [https://www.vaultproject.io/docs/concepts/lease.html](https://www.vaultproject.io/docs/concepts/lease.html)).
[In our third and final post, we will see how to strengthen the security of your applications with Encryption as a Service.](https://mehdilaruelle.com/posts/2019/03/migrate-your-application-secrets-in-vault-step-3/)
Our dynamic secret integration is working well. However, we had to **modify the application workflow** by adding code so that the application could retrieve its secrets dynamically.
Finally, for cleaning purposes, remember to run the following commands:
```bash
$ docker-compose down
$ docker-compose -f app.yml down
$ rm terraform/terraform.tfstate
```
## Migration key takeaways
- The integration of dynamic secrets requires a **modification of the application workflow and therefore of the code itself**. Indeed, the application must be "aware" that the secret has a definite lifespan, and that this one can be brought to change. This issue is not related to Vault, but to the **secret lifetime**.
- Our application no longer uses **static secrets and the entrypoint from the previous integration is no longer needed** in our example. We removed it, but if our app used any other static secrets we should have kept it.
- The scope of action of the Ops is widening and is no longer limited to the Vault but **to the entire infrastructure**. It is no longer a question of storing a simple secret in the Vault but of **setting up a connection between the Vault and the databases**. So be careful with **securing network flows** (ACL, Firewall, etc.) between Vault and databases!
- Thanks to the dynamic secret logic, each secret has a more or less short **limited lifetime**. The notion of password rotation no longer exists. The secret is issued to the application **the time it takes to interact with the service** in question (eg database): this is the philosophy of Secret as a Service.
## Warning
**The application does not necessarily revoke the secret** (the case of our demonstration). Vault will therefore have to do this after a certain period of time. **The complexity is therefore to define the lifetime of the secret**. It should be neither too short nor too long. It is therefore necessary to identify upstream the right compromise to adopt.
**It should also be kept in mind that a large number of secret creations can overload a service**. Take the case of a database: if for each connection to our website we create a user, we can quickly end up with millions of different database users every minute, in the case of a site with heavy traffic.
**The solution is therefore to set a TTL and a max TTL according to the real needs of the application**. TTL is the standard lifetime of the secret and the max TTL is the length of time the secret should not exceed no matter what. For example, we set a TTL of 1h and a max TTL of 24h. If the application considers that access to the service will be unusually long, it can request a **renew** of its secret (extend the duration of its secret) without exceeding the maximum TTL (eg: Renew its secret of one hour). The complexity is finding a good compromise (eg: [https://www.vaultproject.io/docs/concepts/lease.html](https://www.vaultproject.io/docs/concepts/lease.html)).
[In our third and final post, we will see how to strengthen the security of your applications with Encryption as a Service.](https://mehdilaruelle.com/posts/2019/03/migrate-your-application-secrets-in-vault-step-3/)
---
Originally published at https://mehdilaruelle.com/posts/2019/03/migrate-your-application-secrets-in-vault-step-2/