# Migrate your application secrets in Vault (step 1)
> Move the secrets out of your application's configuration into HashiCorp Vault, with Terraform and without touching the code. Step 1 of the series.
2019-03-28 · Vault, HashiCorp, Secrets management, Terraform
Creating, storing or transferring secrets within an application has always been a challenge. Even today bad practices persist, such as sending emails with credentials, weakening the security of your applications. [Vault](https://www.vaultproject.io/), with the help of [Terraform](https://www.terraform.io/) makes it possible to respond to the problems of storing and distributing secrets. We will see in this tutorial how Vault allows you to secure the management of your passwords and secrets… by making them disappear.
As the subject is vast, it will be covered in three posts aimed at presenting the steps for integrating the Vault into an application. Each major step constitutes a post, and each one follows on from the last:
- [Post 1 : Migrate static secrets](https://mehdilaruelle.com/posts/2019/03/migrate-your-application-secrets-in-vault-step-1/)
- [Post 2 : Migrate dynamic secrets (Secret as a Service)](https://mehdilaruelle.com/posts/2019/03/migrate-your-application-secrets-in-vault-step-2/)
- [Post 3 : Encryption as a service](https://mehdilaruelle.com/posts/2019/03/migrate-your-application-secrets-in-vault-step-3/)
We will thus see how to implement each of these steps within an application, what this changes for the application, and the points to watch out for in this migration.
To begin with, we will briefly present Vault and Terraform, then the demonstration application environment, and its secret distribution / storage issues.
## Prerequisites
If you do not know Vault, I invite you to try the interactive tutorial on the official website [Vault](https://www.vaultproject.io/#/demo/0) in order to get a first idea. I also advise you to read the post on [Vault authentication methods](https://mehdilaruelle.com/posts/2018/09/how-to-choose-your-authenticate-method-with-vault/) in order to better understand and implement Vault integration at the application level.
We will also use [Docker](https://www.docker.com/) and [Docker compose](https://docs.docker.com/compose/) in order to simplify our demonstrations.
We will use here **Vault in conjunction with Terraform**, the two tools having a good integration. We'll see what each of them brings, and **why it is interesting to combine them**.
## Vault and Terraform: Overview
### Vault: management and protection of secrets
Vault is a multi-environment secret centralization solution (cloud, hybrid, intranet, etc.) used for **storage, access and distribution of secrets**. These can be of all types: username / password, certificate, encryption key, etc.
Interaction with the tool can be done via UI, CLI or even REST API allowing integration with devops tools or applications. Vault stands out, compared to other tools, by its **secret lifecycle management**:
- [Static secrets](https://www.vaultproject.io/docs/secrets/kv/index.html) stored as [key/value](https://www.vaultproject.io/docs/secrets/kv/index.html) allowing any form of secret to be stored and found in most tools. Integrating static secrets is straightforward but requires the implementation of a password rotation method.
- Dynamic secrets or otherwise called [Secret as a Service](https://www.vaultproject.io/docs/secrets/). In this case, the secrets have a short lifespan determined by the access time to the service.
Take the example of an application wishing to access a database ([database secret engine](https://www.vaultproject.io/docs/secrets/databases/index.html))
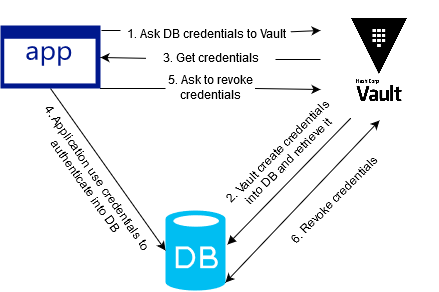 The application requests access to a database from Vault. Vault creates this access, then provides the credentials to the application. Once received, the application connects to the database to interact with it. Then the application asks Vault to revoke access to the database, and Vault finally removes the credentials. Every dynamic secret has a **default lifetime**, in the event that the application does not contact Vault to revoke access, then Vault will take care of revoking them.
Thus, the secrets are provided on demand with a defined duration which offers the advantage of **no longer having password rotation**. Each time you log in, the application uses Vault as an intermediary.
- Finally, Vault is able to do [Encryption as a Service](https://learn.hashicorp.com/vault/encryption-as-a-service/eaas-transit), for **encrypt data in transit or at rest**. This allows **reduce the application complexity linked to encryption key management** (storage, life cycle, key exchange, etc.) but also encryption / decryption operations.
### Terraform: plan, create, modify and version the infrastructure
[Terraform](https://www.terraform.io/) enables infrastructure planning, creation, modification and versioning. Based on HCL language ([Hashicorp Configuration Language](https://github.com/hashicorp/hcl)), Terraform makes it possible to transform its infrastructure into **Infrastructure as Code** (IaC).
In our context, Terraform will have a somewhat more specific role than in its usual use. It will play the role of **facilitator** for Vault, both in its configuration and its integration on the application side.
On the one hand, it will allow us to configure the Vault service with the [dedicated Terraform provider](https://www.terraform.io/docs/providers/vault/index.html) and [integrate Vault policies on an ongoing basis](https://www.hashicorp.com/blog/continuously-integrating-policy-into-vault).
On the other hand, it will allow us to integrate Vault easily and securely with applications. It will have the role of a trusted third party that we will use with Vault's [Approle](https://www.vaultproject.io/docs/auth/approle.html) method. In the context of this post, we will not be able to fully integrate the good practice of this method but you can refer to the [Vault documentation](https://learn.hashicorp.com/vault/developer/iam-authentication).
Of course, all of these things can be done without Terraform, but integrating Terraform with Vault makes it much easier for us.
## Setting up the environment
Now that we've gone through the tools, let's go **set up our environment to be secured with Vault**.
We are going to take **as an example a PHP website** under apache using a MySQL database (LAMP stack). In order to simplify the examples but also to better focus on using Vault, we are going to minimize our application.
To do this, we will need:
- **Vault** in version 1.0.3
- **Terraform** in version 0.11.10
- A web application **PHP 7.2 and apache**
- A database that will be here **MySQL** in version 5.7
You will find the **sources** to reproduce this environment here.
Let's take a closer look at the **[docker-compose.yml](https://github.com/mehdilaruelle/vault-demo/blob/master/step0/docker-compose.yml)** which represents here our application which is divided into three services:
- **Vault**: The Vault server launched in developer mode.
- **Web**: Our PHP web application embedded by the apache web server. We create our web image upstream, via the dockerfile, in order to install mysqli which will allow it to interact with the database. Finally, the current web folder will contain our web pages: here index.php only.
- **Db**: The MySQL database where we have:
- 2 users created: **root** and **dev**.
- A named database: **test**
Finally, to complete this tour, let's set up our environment with the following command:
```bash
$ docker-compose up
```
By accessing the website via the following address: [http://127.0.0.1:8080](http://127.0.0.1:8080), we should end up with the following page:
The application requests access to a database from Vault. Vault creates this access, then provides the credentials to the application. Once received, the application connects to the database to interact with it. Then the application asks Vault to revoke access to the database, and Vault finally removes the credentials. Every dynamic secret has a **default lifetime**, in the event that the application does not contact Vault to revoke access, then Vault will take care of revoking them.
Thus, the secrets are provided on demand with a defined duration which offers the advantage of **no longer having password rotation**. Each time you log in, the application uses Vault as an intermediary.
- Finally, Vault is able to do [Encryption as a Service](https://learn.hashicorp.com/vault/encryption-as-a-service/eaas-transit), for **encrypt data in transit or at rest**. This allows **reduce the application complexity linked to encryption key management** (storage, life cycle, key exchange, etc.) but also encryption / decryption operations.
### Terraform: plan, create, modify and version the infrastructure
[Terraform](https://www.terraform.io/) enables infrastructure planning, creation, modification and versioning. Based on HCL language ([Hashicorp Configuration Language](https://github.com/hashicorp/hcl)), Terraform makes it possible to transform its infrastructure into **Infrastructure as Code** (IaC).
In our context, Terraform will have a somewhat more specific role than in its usual use. It will play the role of **facilitator** for Vault, both in its configuration and its integration on the application side.
On the one hand, it will allow us to configure the Vault service with the [dedicated Terraform provider](https://www.terraform.io/docs/providers/vault/index.html) and [integrate Vault policies on an ongoing basis](https://www.hashicorp.com/blog/continuously-integrating-policy-into-vault).
On the other hand, it will allow us to integrate Vault easily and securely with applications. It will have the role of a trusted third party that we will use with Vault's [Approle](https://www.vaultproject.io/docs/auth/approle.html) method. In the context of this post, we will not be able to fully integrate the good practice of this method but you can refer to the [Vault documentation](https://learn.hashicorp.com/vault/developer/iam-authentication).
Of course, all of these things can be done without Terraform, but integrating Terraform with Vault makes it much easier for us.
## Setting up the environment
Now that we've gone through the tools, let's go **set up our environment to be secured with Vault**.
We are going to take **as an example a PHP website** under apache using a MySQL database (LAMP stack). In order to simplify the examples but also to better focus on using Vault, we are going to minimize our application.
To do this, we will need:
- **Vault** in version 1.0.3
- **Terraform** in version 0.11.10
- A web application **PHP 7.2 and apache**
- A database that will be here **MySQL** in version 5.7
You will find the **sources** to reproduce this environment here.
Let's take a closer look at the **[docker-compose.yml](https://github.com/mehdilaruelle/vault-demo/blob/master/step0/docker-compose.yml)** which represents here our application which is divided into three services:
- **Vault**: The Vault server launched in developer mode.
- **Web**: Our PHP web application embedded by the apache web server. We create our web image upstream, via the dockerfile, in order to install mysqli which will allow it to interact with the database. Finally, the current web folder will contain our web pages: here index.php only.
- **Db**: The MySQL database where we have:
- 2 users created: **root** and **dev**.
- A named database: **test**
Finally, to complete this tour, let's set up our environment with the following command:
```bash
$ docker-compose up
```
By accessing the website via the following address: [http://127.0.0.1:8080](http://127.0.0.1:8080), we should end up with the following page:
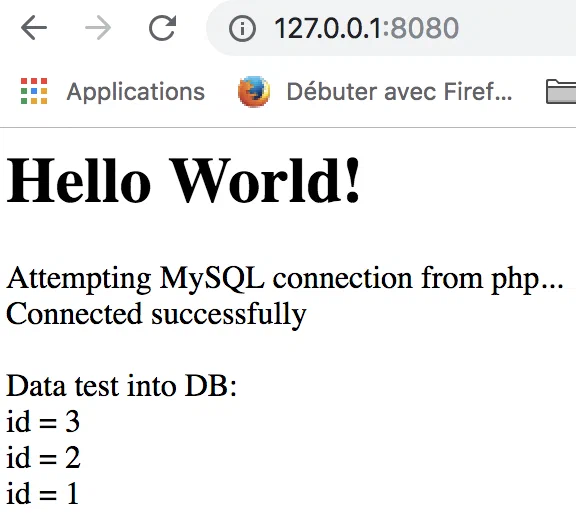 The action done by the PHP web application is quite simple:
1. The application connects to the **test** database with the user **dev**.
2. Drops the **test** table if it exists.
3. Create the table **test**.
4. Insert 3 values into the table: **1**, **2** and **3**.
5. Retrieves all the values in the table **test**.
6. Displays the result of the retrieved values.
All of these actions are defined in the file **[web/index.php](https://github.com/mehdilaruelle/vault-demo/blob/master/step0/web/index.php)**. Finally, we also have access to the Vault GUI at the following address: [http://127.0.0.1:8200](http://127.0.0.1:8200)
The action done by the PHP web application is quite simple:
1. The application connects to the **test** database with the user **dev**.
2. Drops the **test** table if it exists.
3. Create the table **test**.
4. Insert 3 values into the table: **1**, **2** and **3**.
5. Retrieves all the values in the table **test**.
6. Displays the result of the retrieved values.
All of these actions are defined in the file **[web/index.php](https://github.com/mehdilaruelle/vault-demo/blob/master/step0/web/index.php)**. Finally, we also have access to the Vault GUI at the following address: [http://127.0.0.1:8200](http://127.0.0.1:8200)
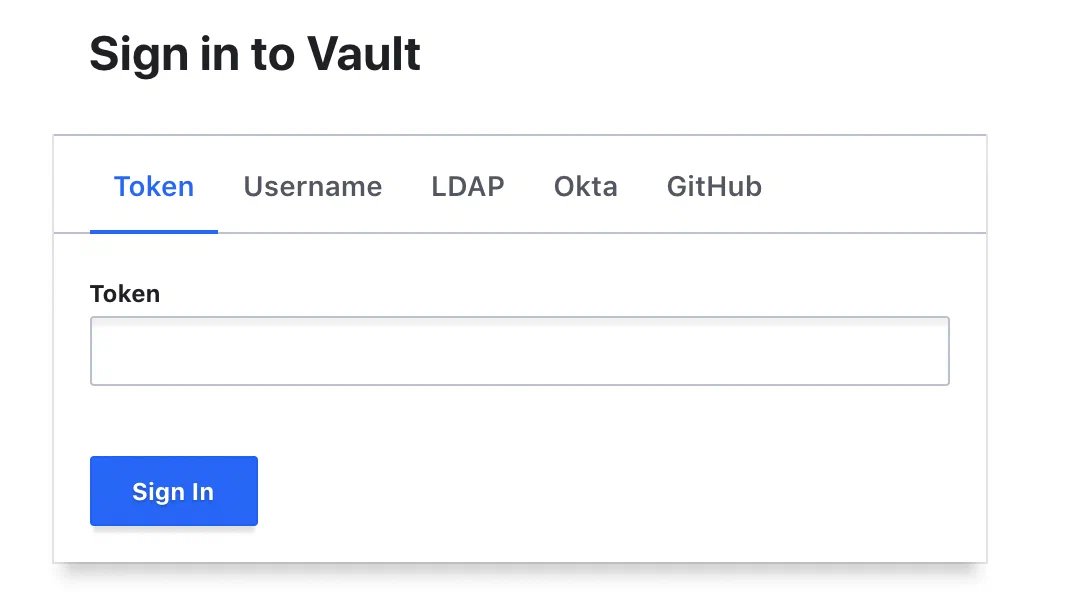 You can identify yourself with the following token: **root**
### Identify unprotected secrets within the web application
As we have seen, the environment is quite simple. Our goal, as a first step, is to **identify secrets within the web application that may be subject to disclosure**. Thus we will not take into account Vault or the MySQL database which are launched in "dev" mode in order to simplify the environment.
So let's start looking at our web service at **[docker-compose.yml](https://github.com/mehdilaruelle/vault-demo/blob/master/step0/docker-compose.yml)**:
```yaml
web:
build: .
container_name: php
environment:
- DB_HOST=${MYSQL_HOST}
- DB_NAME=${MYSQL_DATABASE}
- DB_USER=${MYSQL_USER}
depends_on:
- db
volumes:
- ./web/:/var/www/html/
ports:
- "8080:80"
```
All of the environment variables do not contain any sensitive information: database name, user name and host name. However, on the file side **[web/index.php](https://github.com/mehdilaruelle/vault-demo/blob/master/step0/web/index.php)** we notice that **the pass variable contains the password of the database user**:
```php
$host = getenv('DB_HOST');
$dbname = getenv('DB_NAME');
$user = getenv('DB_USER');
$pass = "dev";
```
Here, the use of a credentials file or the declaration of the variable in the docker-compose does not solve our problem because the secret will always be visible
In the event that the application is hosted on a repository of type [Git](https://git-scm.com/) and used by a CI / CD pipeline, it becomes critical to hide this secret so that the various actors cannot become aware of it. So, we need to **remove the visibility of this secret in the code**.
### Migration of the web application to Vault with static secrets
To address this issue, we will migrate the secrets of the web application to Vault with the [Secret Engine k/v version 2](https://www.vaultproject.io/docs/secrets/kv/kv-v2.html).
Using this secret engine allows you to **integrate Vault into the web application without impacting the code itself**. It is also the easiest method to implement.
Regarding the authentication of the application to the Vault, we will use [Approle](https://www.vaultproject.io/docs/auth/approle.html).
You will find the sources for setting up this solution on the previous environment [here](https://github.com/d2si/vault-demo/tree/master/step1).
So here's what we'll **add to the web application deployment process**:
1. Configuration of the Vault, via Terraform (cf: terraform folder), in order to set up:
- The authentication backend: **Approle**
- Approle configuration for the web application so that it can authenticate with Vault
- Creation and implementation of read-only application policies on the following path: **secret/data/web**
2. Providing the Role ID and Secret ID to an environment variable via Docker. To simplify the demonstration, we are not using a CI / CD pipeline, so this step will be manual.
3. Authentication and retrieval of secrets from Vault when the application is started. Here the script **[vault.sh](https://github.com/mehdilaruelle/vault-demo/blob/master/step1/vault.sh)** will perform these actions at the entrypoint of our application container.
The secrets will be environment variables, without impacting the code itself.
### What changes ?
First change, the secret is no longer in the clear in the code, it is recovered within the code via environment variables:
```php
$host = getenv('DB_HOST');
$dbname = getenv('DB_NAME');
$user = getenv('DB_USER');
$pass = getenv('DB_PASSWORD');
```
The second change concerns the docker-compose stack where we removed the application to place it in an isolated stack named **[app.yml](https://github.com/mehdilaruelle/vault-demo/blob/master/step1/app.yml)**, in order to be able to separate the infrastructure and application lifecycles.
Compared to our web service, two notable changes:
1. Adding an entrypoint for script execution **[vault.sh](https://github.com/mehdilaruelle/vault-demo/blob/master/step1/vault.sh)**
2. Adding two environment variables related to Vault **VLT_ADDR** (our Vault address) and **VLT_PATH** (the path of our application secrets). In our case, these variables allow us to simplify our demonstration.
```yaml
entrypoint: ["vault.sh"]
environment:
- DB_HOST=${MYSQL_HOST}
- DB_NAME=${MYSQL_DATABASE}
- VLT_ADDR=http://vault:8200
- VLT_PATH=secret/data/web
```
Finally, we added the script **[vault.sh](https://github.com/mehdilaruelle/vault-demo/blob/master/step1/vault.sh)**. This will be played when our container is initialized and will perform the following steps:
1. Verification and retrieval of expected variables: **Role_ID** and **Secret_ID**
2. Authentication to the Vault with the Approle method using the **Role_ID** and the **Secret_ID**. This will return a Vault token which will allow our application to retrieve its secrets.
3. Retrieving secrets from the path: **secret/data/web**
4. Providing environment variables **DB_USER** and **DB_PASSWORD**
5. Launch of our Apache server
### Testing our example
Now that we have made the changes, it is time for us to test our application.
Let's start by setting up our infrastructure:
1. Folder initialisation with **terraform** in order to retrieve the good providers:
`$ docker run --rm -v $(pwd)/terraform:/app/ -w /app/ hashicorp/terraform:light init`
2. Deployment of our infrastructure:
`$ docker-compose up`
With the infrastructure operational, we can access our Vault via this address: [http://127.0.0.1:8200](http://127.0.0.1:8200)
Since we don't have a CI / CD pipeline, some steps are manual. Let's start by storing our secret in the Vault:
1. Access the Vault via the UI interface: [http://127.0.0.1:8200](http://127.0.0.1:8200/)
2. Use Token authentication with the following token: **root**
3. Select the secret engine 'secret' then create a secret with the path: **web**
4. Enter the secret as in the following screenshot and then click on **Save**
You can identify yourself with the following token: **root**
### Identify unprotected secrets within the web application
As we have seen, the environment is quite simple. Our goal, as a first step, is to **identify secrets within the web application that may be subject to disclosure**. Thus we will not take into account Vault or the MySQL database which are launched in "dev" mode in order to simplify the environment.
So let's start looking at our web service at **[docker-compose.yml](https://github.com/mehdilaruelle/vault-demo/blob/master/step0/docker-compose.yml)**:
```yaml
web:
build: .
container_name: php
environment:
- DB_HOST=${MYSQL_HOST}
- DB_NAME=${MYSQL_DATABASE}
- DB_USER=${MYSQL_USER}
depends_on:
- db
volumes:
- ./web/:/var/www/html/
ports:
- "8080:80"
```
All of the environment variables do not contain any sensitive information: database name, user name and host name. However, on the file side **[web/index.php](https://github.com/mehdilaruelle/vault-demo/blob/master/step0/web/index.php)** we notice that **the pass variable contains the password of the database user**:
```php
$host = getenv('DB_HOST');
$dbname = getenv('DB_NAME');
$user = getenv('DB_USER');
$pass = "dev";
```
Here, the use of a credentials file or the declaration of the variable in the docker-compose does not solve our problem because the secret will always be visible
In the event that the application is hosted on a repository of type [Git](https://git-scm.com/) and used by a CI / CD pipeline, it becomes critical to hide this secret so that the various actors cannot become aware of it. So, we need to **remove the visibility of this secret in the code**.
### Migration of the web application to Vault with static secrets
To address this issue, we will migrate the secrets of the web application to Vault with the [Secret Engine k/v version 2](https://www.vaultproject.io/docs/secrets/kv/kv-v2.html).
Using this secret engine allows you to **integrate Vault into the web application without impacting the code itself**. It is also the easiest method to implement.
Regarding the authentication of the application to the Vault, we will use [Approle](https://www.vaultproject.io/docs/auth/approle.html).
You will find the sources for setting up this solution on the previous environment [here](https://github.com/d2si/vault-demo/tree/master/step1).
So here's what we'll **add to the web application deployment process**:
1. Configuration of the Vault, via Terraform (cf: terraform folder), in order to set up:
- The authentication backend: **Approle**
- Approle configuration for the web application so that it can authenticate with Vault
- Creation and implementation of read-only application policies on the following path: **secret/data/web**
2. Providing the Role ID and Secret ID to an environment variable via Docker. To simplify the demonstration, we are not using a CI / CD pipeline, so this step will be manual.
3. Authentication and retrieval of secrets from Vault when the application is started. Here the script **[vault.sh](https://github.com/mehdilaruelle/vault-demo/blob/master/step1/vault.sh)** will perform these actions at the entrypoint of our application container.
The secrets will be environment variables, without impacting the code itself.
### What changes ?
First change, the secret is no longer in the clear in the code, it is recovered within the code via environment variables:
```php
$host = getenv('DB_HOST');
$dbname = getenv('DB_NAME');
$user = getenv('DB_USER');
$pass = getenv('DB_PASSWORD');
```
The second change concerns the docker-compose stack where we removed the application to place it in an isolated stack named **[app.yml](https://github.com/mehdilaruelle/vault-demo/blob/master/step1/app.yml)**, in order to be able to separate the infrastructure and application lifecycles.
Compared to our web service, two notable changes:
1. Adding an entrypoint for script execution **[vault.sh](https://github.com/mehdilaruelle/vault-demo/blob/master/step1/vault.sh)**
2. Adding two environment variables related to Vault **VLT_ADDR** (our Vault address) and **VLT_PATH** (the path of our application secrets). In our case, these variables allow us to simplify our demonstration.
```yaml
entrypoint: ["vault.sh"]
environment:
- DB_HOST=${MYSQL_HOST}
- DB_NAME=${MYSQL_DATABASE}
- VLT_ADDR=http://vault:8200
- VLT_PATH=secret/data/web
```
Finally, we added the script **[vault.sh](https://github.com/mehdilaruelle/vault-demo/blob/master/step1/vault.sh)**. This will be played when our container is initialized and will perform the following steps:
1. Verification and retrieval of expected variables: **Role_ID** and **Secret_ID**
2. Authentication to the Vault with the Approle method using the **Role_ID** and the **Secret_ID**. This will return a Vault token which will allow our application to retrieve its secrets.
3. Retrieving secrets from the path: **secret/data/web**
4. Providing environment variables **DB_USER** and **DB_PASSWORD**
5. Launch of our Apache server
### Testing our example
Now that we have made the changes, it is time for us to test our application.
Let's start by setting up our infrastructure:
1. Folder initialisation with **terraform** in order to retrieve the good providers:
`$ docker run --rm -v $(pwd)/terraform:/app/ -w /app/ hashicorp/terraform:light init`
2. Deployment of our infrastructure:
`$ docker-compose up`
With the infrastructure operational, we can access our Vault via this address: [http://127.0.0.1:8200](http://127.0.0.1:8200)
Since we don't have a CI / CD pipeline, some steps are manual. Let's start by storing our secret in the Vault:
1. Access the Vault via the UI interface: [http://127.0.0.1:8200](http://127.0.0.1:8200/)
2. Use Token authentication with the following token: **root**
3. Select the secret engine 'secret' then create a secret with the path: **web**
4. Enter the secret as in the following screenshot and then click on **Save**
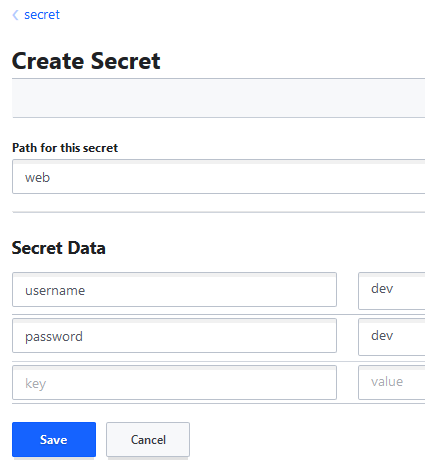 Our secret is now in our Vault. All we have to do is launch our application with the correct **Role_ID** and **Secret_ID**:
```bash
$ role_id=$(docker run --rm -v $(pwd)/terraform:/app/ -w /app/ hashicorp/terraform:light output approle_role_id)
$ secret_id=$(docker run --rm -v $(pwd)/terraform:/app/ -w /app/ hashicorp/terraform:light output approle_secret_id)
$ docker-compose -f app.yml run -e VLT_ROLE_ID=$role_id -e VLT_SECRET_ID=$secret_id --service-ports web
```
Our app is again available at [http://127.0.0.1:8080](http://127.0.0.1:8080) and the result should be the same as the previous step:
Our secret is now in our Vault. All we have to do is launch our application with the correct **Role_ID** and **Secret_ID**:
```bash
$ role_id=$(docker run --rm -v $(pwd)/terraform:/app/ -w /app/ hashicorp/terraform:light output approle_role_id)
$ secret_id=$(docker run --rm -v $(pwd)/terraform:/app/ -w /app/ hashicorp/terraform:light output approle_secret_id)
$ docker-compose -f app.yml run -e VLT_ROLE_ID=$role_id -e VLT_SECRET_ID=$secret_id --service-ports web
```
Our app is again available at [http://127.0.0.1:8080](http://127.0.0.1:8080) and the result should be the same as the previous step:
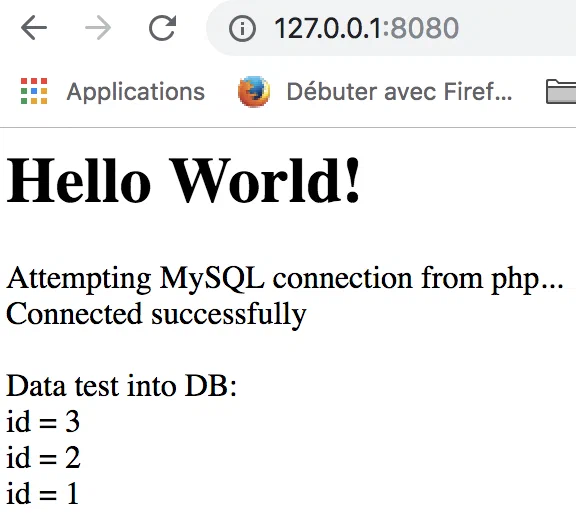 We have been very successful in integrating Vault into our application without impacting the application code.
Finally, for clean, don't forget to run the following commands:
```bash
$ docker-compose down
$ docker-compose -f app.yml down
$ rm terraform/terraform.tfstate
```
## Migration key takeaways
- The application code has not changed (except for the secret deletion)
- A script has been added at the entrypoint in order to interact with the Vault to retrieve the secrets and store them as an environment variable
- Before the application is deployed, the Vault must be configured to allow Approle authentication of the application and the database secret to be stored there. This step must be automated on the Ops side
The integration of the Vault is transparent on the developer side, but this method does not solve the problem of **secret rotation**, or even the knowledge of the secret by the ops.
**[In our next post, we will see how to solve these problems through dynamic secrets (Secret as a Service).](https://mehdilaruelle.com/posts/2019/03/migrate-your-application-secrets-in-vault-step-2/)**
We have been very successful in integrating Vault into our application without impacting the application code.
Finally, for clean, don't forget to run the following commands:
```bash
$ docker-compose down
$ docker-compose -f app.yml down
$ rm terraform/terraform.tfstate
```
## Migration key takeaways
- The application code has not changed (except for the secret deletion)
- A script has been added at the entrypoint in order to interact with the Vault to retrieve the secrets and store them as an environment variable
- Before the application is deployed, the Vault must be configured to allow Approle authentication of the application and the database secret to be stored there. This step must be automated on the Ops side
The integration of the Vault is transparent on the developer side, but this method does not solve the problem of **secret rotation**, or even the knowledge of the secret by the ops.
**[In our next post, we will see how to solve these problems through dynamic secrets (Secret as a Service).](https://mehdilaruelle.com/posts/2019/03/migrate-your-application-secrets-in-vault-step-2/)**
---
Originally published at https://mehdilaruelle.com/posts/2019/03/migrate-your-application-secrets-in-vault-step-1/